.png)
[Swift] Make a picker view in IOS by using Swift code
Hi, Hi,
Hi,I would share my little experiences on how to make a picker view in ios by using their latest programming language, Swift.
Getting Started
Open Xcode and create a new project with Single Page Application and the programming language is Swift.
Declare properties in ViewController.swift
Add the following line to ViewController.swift, it will define the @IBOutlet in Main Storyboard.
// PickerView
@IBOutlet weak var pickerView: UIPickerView!
// Done button to select row in pickerview
@IBOutlet weak var doneButton: UIButton!
// Cancel button
@IBOutlet weak var cancelButton: UIButton!
// Textfield contains selected row
@IBOutlet weak var resultTextField: UITextField!
// OPTIONAL: just a grey view :)
@IBOutlet weak var greyView: UIView!
Create Pickerview and related objects
Switch to Main.storyboard and add the following objects to View Controller. Then the appropriate constraints will be added into each control.* Just leave the greyView after we have finished everything. This is an optional view to hide the currentView and put more focus of your eyes into PickerView. It is my ideas so if anyone don't like it, feel free to wipe it away :).

Remember to check hidden in Attributes inspector of pickerview, done button and cancel button. We don't want it to be visible, just only when Show Pickerview button is clicked.
Finally, add some constraints to all control that fit into your target devices.
Connect @IBOutlet to Storyboard
Click on View Controller Scene and drag the Outlets to controls in our View Controller.

Conform UIPickerViewDelegate and UIPickerViewDataSource
Add the UIPickerViewDelegate protocol and UIPickerViewDataSource protocol next to UIViewController to conform it.
class ViewController: UIViewController, UIPickerViewDelegate, UIPickerViewDataSource {
...
}
Add sample data and Implement protocol functions
Before implement the UIPickerViewDelegate and UIPickerViewDataSource function, we need to declare a simple array to hold the pickerview data.
// Pickerview data
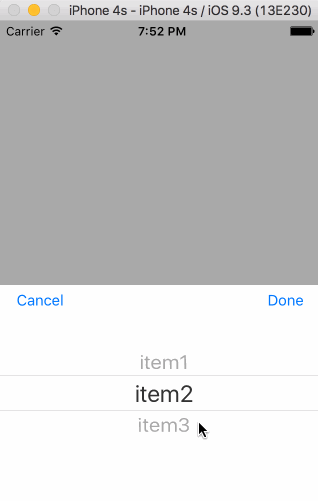
var matgroupPickerData = ["item1", "item2", "item3"]
Now go to the bottom of the file just before "}" and implement those functions, they comes from the two protocols you just implemented above.
// Number of components in pickerview
func numberOfComponentsInPickerView(pickerView: UIPickerView) -> Int {
return 1
}
// Number of rows in each component
func pickerView(pickerView: UIPickerView, numberOfRowsInComponent component: Int) -> Int {
return pickerData.count
}
// Title for each row in component
func pickerView(pickerView: UIPickerView, titleForRow row: Int, forComponent component: Int) -> String? {
return pickerData[row]
}
// Get the selected row
func pickerView(pickerView: UIPickerView, didSelectRow row: Int, inComponent component: Int) {
// Nothing to do in this tutorial
}
* We use 1 component to simplify the tutorial. If you are thinking about multiple components, then have a look at the below picture (3 components in this pickerview).

Now, we need to activate the hidden control when Show Pickerview is being clicked. Add the following function right below the above functions.
// Show or hide pickerview
func showPickerView(check: Bool) {
doneButton.hidden = !check
cancelButton.hidden = !check
pickerView.hidden = !check
//greyView.hidden = !check
}
// ViewPickerView button
@IBAction func viewPickerViewClicked(sender: UIButton) {
showPickerView(true)
}
// Cancel button
@IBAction func cancelButtonClicked(sender: UIButton) {
showPickerView(false)
}
// Done Button
@IBAction func doneButtonClicked(sender: UIButton) {
// Get the selected row in first component - we only have 1 component
let selectedRow = pickerView.selectedRowInComponent(0)
// Set the text field to corresponding row item
resultTextField.text = pickerData[selectedRow]
// Hide picker view
showPickerView(false)
}
Navigate back to Main.storyboard and drag the @IBAction to corresponding control. Then we are set to go. Below is the final look on ViewController class.
OPTIONAL: Add another UIView on top of ViewController
You can either do this or not do this, it does not affect the application.
class ViewController: UIViewController, UIPickerViewDelegate, UIPickerViewDataSource {
// PickerView
@IBOutlet weak var pickerView: UIPickerView!
// Done button to select row in pickerview
@IBOutlet weak var doneButton: UIButton!
// Cancel button
@IBOutlet weak var cancelButton: UIButton!
// Textfield contains selected row
@IBOutlet weak var resultTextField: UITextField!
// OPTIONAL: just a grey view :)
@IBOutlet weak var greyView: UIView!
// Pickerview data
var pickerData = ["item1", "item2", "item3"]
override func viewDidLoad() {
super.viewDidLoad()
// Do any additional setup after loading the view, typically from a nib.
pickerView.dataSource = self
pickerView.delegate = self
}
override func didReceiveMemoryWarning() {
super.didReceiveMemoryWarning()
// Dispose of any resources that can be recreated.
}
// Number of components in pickerview
func numberOfComponentsInPickerView(pickerView: UIPickerView) -> Int {
return 1
}
// Number of rows in each component
func pickerView(pickerView: UIPickerView, numberOfRowsInComponent component: Int) -> Int {
return pickerData.count
}
// Title for each row in component
func pickerView(pickerView: UIPickerView, titleForRow row: Int, forComponent component: Int) -> String? {
return pickerData[row]
}
// Get the selected row
func pickerView(pickerView: UIPickerView, didSelectRow row: Int, inComponent component: Int) {
// Nothing to do in this tutorial
}
// Show or hide pickerview
func showPickerView(check: Bool) {
doneButton.hidden = !check
cancelButton.hidden = !check
pickerView.hidden = !check
greyView.hidden = !check
}
// ViewPickerView button
@IBAction func viewPickerViewClicked(sender: UIButton) {
showPickerView(true)
}
// Cancel button
@IBAction func cancelButtonClicked(sender: UIButton) {
showPickerView(false)
}
// Done Button
@IBAction func doneButtonClicked(sender: UIButton) {
// Get the selected row in first component - we only have 1 component
let selectedRow = pickerView.selectedRowInComponent(0)
// Set the text field to corresponding row item
resultTextField.text = pickerData[selectedRow]
// Hide picker view
showPickerView(false)
}
}
Search for UIView in Object box at the bottom right, then drag into View Controller, stretch it to fit in the whole View Controller. Then set the constraints equal 0 in 4 directions, remember to un-tick the margin. Let the UIView stay above PickerView so that when you click the Show Pickerview button, it will stay on top of UIView.

Run it
It's time to give a shot about how our pickerview work. Hit the run button and see the result.
In case you missed anything, try to have a look in this source code.
Feel free to share it if you find it useful.
Thanks

![[Swift] Let's make Pokemon Index using UICollectionView by swift code](https://blogger.googleusercontent.com/img/b/R29vZ2xl/AVvXsEiLzex0uIIr9l2MrLjCdsCDePgVfzPsBwtm2yumpF4iGEhGLrkqsqYyVua3_3R_XV0jC2ZVAlXJU_nKxx9ksGzE717majtKBmnWyDmc-R6DGV-kaSS5XI2AU_YWWGZvTcUlkC-b4p_HzNGO/s72-c-h240/Screen+Shot+2016-08-17+at+12.15.38+AM.png)
![[Swift] Make a picker view in IOS by using Swift code](https://blogger.googleusercontent.com/img/b/R29vZ2xl/AVvXsEh-6PgsAJuAsLFVRSm8fHTq1w4uWkvqdmhgspGeSlvyo7A0aIoawHZA5QIqRrRz6ooTqY4zpIDa6D7ms8fyK9M4nQG-eC9XTPgazt6eX67OpLsmE33lNm2HnFZHeHoczeybw3l8SfjkYrNu/s72-c-h232/Screen+Shot+2016-08-16+at+10.34.25+PM.png)
![[Swift] How to call REST API in iOS by using Swift code](https://blogger.googleusercontent.com/img/b/R29vZ2xl/AVvXsEhj03VaPksmFY47bXeRutwv4h5P-j_PlcC47UEfZP9vSPLrjO1zR9-cpogdwGgs9z70mrbnB9dwFt7NUZ2sdwfkD0VMRokgUANoVNG8sfUEo0NCRWauPClLr-PBNFEUHtfT0JpKn0sS1wRp/s72-c-h130/Screen+Shot+2016-08-16+at+10.43.32+PM.png)
![[Swift] Make a Table View in IOS by using swift code](https://blogger.googleusercontent.com/img/b/R29vZ2xl/AVvXsEjuaHPvZIBCK96PpFAetusIYUf1zqog3tSfjnRJq41Ea3AWGX2MXcAudoQKmfJx8xEm19zID78o2crRYeqQeTTwhyphenhyphenPNvoeh_O26vv8DwcW5TI2AaLnYNDufND6LI26L1QhYC2Nc7cbs_aHy/s72-c-h240/Screen+Shot+2016-08-16+at+10.37.45+PM.png)
0 comments: