[Swift] Let's make Pokemon Index using UICollectionView by swift code
Hi guys,Today I'm going to show you making a UICollectionView in iOS by using Swift. Let's do something a bit more interested so we will create a Pokemon Index in iOS application.
Getting Started
Open Xcode -> New Project and select "Single View Application". Next type in project name "PokemonIndex"
Then download the PokemonImage.zip and extract it somewhere else.
Create a collection view
Do the following steps to create a User Interface of Pokemon Index:
Next, adding some constraints to Collection View to make it always stay the same as View Controller size.
Search for image view and put it into the collection view.
- - Open Main.storyboard -> click on the created View Controller.
- - Navigate to Editor -> Embed In -> Navigation Controller.
- - Drag a Collection View into View Controller and make it fit into the whole view.
- - Click on the middle of Navigation bar in View Controller, name it "Pokemon Index"
- - Select View Controller again, go the Attributes Inspector, un-click the option "Adjust Scroll View Insets"
Next, adding some constraints to Collection View to make it always stay the same as View Controller size.
- - Click on the small square icon at the bottom right of Xcode.
- - Un-tick constraint to margins, set 4 constraints to 0 and click on the red line next to each box.
- - Resize image view 50x50 for easily fit into a collection view.
- - Select image view and add constraints as same as collection view as above.
Coding time
Let's do a few writing tasks, open ViewController.swift and add the following lines. But before doing this, remember to import those line on top of the file.
import UIKit
import SpriteKit
Define enum for any Poke related stuff
// Can define any number related to pokemon
enum PokemonInt: Int {
case PokemonIndexCount = 151
}
ViewController.swift
class ViewController: UIViewController {
@IBOutlet weak var pokemonCollectionView: UICollectionView!
override func viewDidLoad() {
super.viewDidLoad()
// Do any additional setup after loading the view, typically from a nib.
pokemonCollectionView.delegate = self
pokemonCollectionView.dataSource = self
}
override func didReceiveMemoryWarning() {
super.didReceiveMemoryWarning()
// Dispose of any resources that can be recreated.
}
}
Conform Collection View protocols
// MARK: - UICollectionViewDelegateFlowLayout protocol
extension ViewController: UICollectionViewDelegateFlowLayout {
func collectionView(collectionView: UICollectionView, layout collectionViewLayout: UICollectionViewLayout, sizeForItemAtIndexPath indexPath: NSIndexPath) -> CGSize {
let width = UIScreen.mainScreen().bounds.size.width / 5
let height = width
return CGSize(width: width, height: height)
}
func collectionView(collectionView: UICollectionView, layout collectionViewLayout: UICollectionViewLayout, minimumLineSpacingForSectionAtIndex section: Int) -> CGFloat {
return 0.0
}
func collectionView(collectionView: UICollectionView, layout collectionViewLayout: UICollectionViewLayout, minimumInteritemSpacingForSectionAtIndex section: Int) -> CGFloat {
return 0.0
}
}
// MARK: - UICollectionViewDataSource protocol
extension ViewController: UICollectionViewDataSource {
// tell the collection view how many cells to make
func collectionView(collectionView: UICollectionView, numberOfItemsInSection section: Int) -> Int {
return PokemonInt.PokemonIndexCount.rawValue
}
func collectionView(collectionView: UICollectionView, cellForItemAtIndexPath indexPath: NSIndexPath) -> UICollectionViewCell {
let cell = self.pokemonCollectionView.dequeueReusableCellWithReuseIdentifier("PokemonCell", forIndexPath: indexPath) as! PokemonIndexCell
let texture = SKTexture(imageNamed: "pokemon_\(indexPath.row + 1)")
cell.pokemonImage.image = UIImage(CGImage: texture.CGImage())
return cell
}
}
Add Pokemon Images collection
Now, you have extracted the downloaded images at the top of this tutorial.
- - We will go to Assets.xcassets in project tree view.
- - Click the "+" button at the bottom and select New Sprite Atlas.
- - Right click on created Sprites folder - > Import...
- - Select all the images in extracted images folder.
Connect all components with corresponding classes in Main.storyboard
Now, go to Main.storyboard and fill in the custom classes in Collection View Cell and get the missing connection to the right place of it.
Collection View Cell
Select the cell below the collection view in storyboard and navigate to Identity Inspectors. Change custom class as same as below picture.
Move to the Connection Inspector and drag the pokemonImage to ImageView in Collection View cell.
Change the identifier in Attributes Inspector to PokemonCell
ViewController.Swift
Do the same in View Controller, we need to connect the @IBOutlet declared in swift file to the one in this view.
Then move to Collection View and change its background from black to white color.
Run it
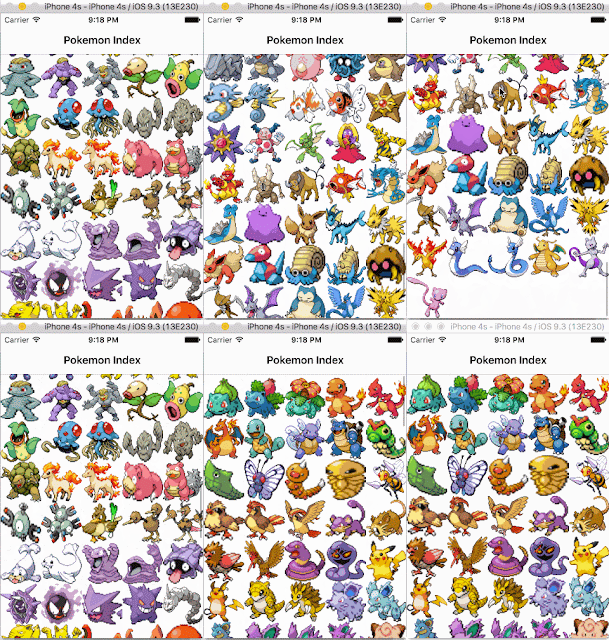
Hit the button on top to run it and enjoy the Pokemon Index :p.
* You can find another sprites with better resolution and change Mode Scale to Fill to another one, that suit your target devices the best.
In case you missed anything, try to have a look in this source code.
Feel free to share it if you find it useful.
Thanks
.png)
 Hi guys,


![[Swift] Let's make Pokemon Index using UICollectionView by swift code](https://blogger.googleusercontent.com/img/b/R29vZ2xl/AVvXsEiLzex0uIIr9l2MrLjCdsCDePgVfzPsBwtm2yumpF4iGEhGLrkqsqYyVua3_3R_XV0jC2ZVAlXJU_nKxx9ksGzE717majtKBmnWyDmc-R6DGV-kaSS5XI2AU_YWWGZvTcUlkC-b4p_HzNGO/s72-c-h240/Screen+Shot+2016-08-17+at+12.15.38+AM.png)
![[Swift] Make a picker view in IOS by using Swift code](https://blogger.googleusercontent.com/img/b/R29vZ2xl/AVvXsEh-6PgsAJuAsLFVRSm8fHTq1w4uWkvqdmhgspGeSlvyo7A0aIoawHZA5QIqRrRz6ooTqY4zpIDa6D7ms8fyK9M4nQG-eC9XTPgazt6eX67OpLsmE33lNm2HnFZHeHoczeybw3l8SfjkYrNu/s72-c-h232/Screen+Shot+2016-08-16+at+10.34.25+PM.png)
![[Swift] How to call REST API in iOS by using Swift code](https://blogger.googleusercontent.com/img/b/R29vZ2xl/AVvXsEhj03VaPksmFY47bXeRutwv4h5P-j_PlcC47UEfZP9vSPLrjO1zR9-cpogdwGgs9z70mrbnB9dwFt7NUZ2sdwfkD0VMRokgUANoVNG8sfUEo0NCRWauPClLr-PBNFEUHtfT0JpKn0sS1wRp/s72-c-h130/Screen+Shot+2016-08-16+at+10.43.32+PM.png)
![[Swift] Make a Table View in IOS by using swift code](https://blogger.googleusercontent.com/img/b/R29vZ2xl/AVvXsEjuaHPvZIBCK96PpFAetusIYUf1zqog3tSfjnRJq41Ea3AWGX2MXcAudoQKmfJx8xEm19zID78o2crRYeqQeTTwhyphenhyphenPNvoeh_O26vv8DwcW5TI2AaLnYNDufND6LI26L1QhYC2Nc7cbs_aHy/s72-c-h240/Screen+Shot+2016-08-16+at+10.37.45+PM.png)
One of the key features said to be coming to
ReplyDeletethe HomePod is the ability to make or receive phone calls
Read More At iOS Online Training Bangalore
kayseriescortu.com - alacam.org - xescortun.com
ReplyDeleteperde modelleri
ReplyDeleteMobil Onay
mobil ödeme bozdurma
nft nasıl alınır
Ankara evden eve nakliyat
trafik sigortası
dedektör
kurma.website
aşk kitapları
smm panel
ReplyDeletesmm panel
İŞ İLANLARI BLOG
İNSTAGRAM TAKİPÇİ SATIN AL
hirdavatciburada.com
beyazesyateknikservisi.com.tr
Servis
TİKTOK HİLE